 |
AR-CAL.CHECK-(U or E)
Calibration Checker for AR-7 and AR-8 Wrist Strap and Footwear Testers |
  en français en français
AR-CAL.CHECK is a New Addition to our microprocessor controlled line of Wrist Strap and Footwear Testers. It provides the user of AR-7 or AR-8 Testers with a vehicle to test at his own facility the accuracy of calibration without the need of sending them to a manufacturer or a Distributor for periodic check.
Please see Operating Instruction (Manual) to find out how easy it is to verify if your Wrist Strap/Footwear testers are properly calibrated.
Operating Instructions:
Note: Please make sure that you have correct model of the AR-CAL.CHECK-X, appropriate for your location. Model AR-CAL.CHECK-U is for North America and model AR-CAL.CHECK-E is for Europe. Do not touch metal elements during entire testing procedure.
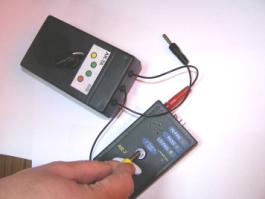
A1. Connect Calibration Checker with AR-7 Wrist Strap Tester
|
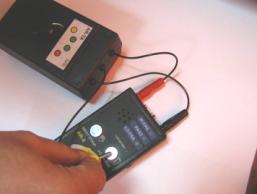
B1. Connect Calibration Checker with AR-8 Wrist and Footwear Tester
|
 |
 |
- Plug red banana plug of the AR-CAL.CHECK Calibration Checker into left, red socket of the AR-7 tester.
|
- Plug red banana plug of the AR-CAL.CHECK Calibration Checker into left, red socket of the AR-8 tester.
- Plug black banana plug of the Calibration Checker into right, black socket of the AR-8 tester.
|
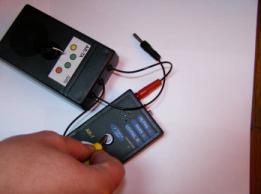
2. Testing Low Fail
Set the rotary switch on the front panel of the checker to the first position (Yellow circle).
| Testing AR-7 Wrist Strap Tester |
AR-8 Wrist Strap and Footwear Tester |
| |
|
- Hold Yellow banana plug properly in such a way so that your finger does not touch banana plug metal section.
- Press and hold metal pushbutton in the center of the tester with yellow banana plug.
- When the calibration is correct, AR-7 tester should indicate "LO-FAIL" (Yellow LED will illuminate).
- Release the pushbutton.
- If yellow LED did not illuminate, the unit needs to be re-calibrated.
|
- Hold Yellow banana plug properly in such a way so that your finger does not touch banana plug metal section.
- Press and hold metal pushbutton on the left side of the tester (wrist strap button) with yellow banana plug.
- When the calibration is correct, AR-8 tester should indicate "LO-FAIL" (Yellow LED will illuminate).
- Release the pushbutton.
- Press and hold metal pushbutton on the right of the tester (footwear button) with yellow banana plug.
- When the calibration is correct, AR-8 tester should indicate "LO-FAIL" (Yellow LED will illuminate).
- Release the pushbutton.
|
3. Testing Pass Level
3a. Testing Low Pass
Set the rotary switch on the front panel of the checker to the second position (Left Green Circle)- Low Pass
| Testing AR-7 Wrist Strap Tester |
AR-8 Wrist Strap and Footwear Tester |
 |
- Press and hold metal pushbutton on the left of the tester (wrist strap button) by the yellow banana plug.
- When the calibration is correct, AR-8 tester should indicate "PASS" (Green LED will illuminate).
- Release the pushbutton.
- Press and hold metal pushbutton on the right of the tester (footwear button) by the yellow banana plug.
- When the calibration is correct, AR-8 tester should indicate "PASS" (Green LED will illuminate).
- Release the pushbutton.
|
- Press and hold metal pushbutton on the center of the tester by the yellow banana plug.
- When the calibration is correct, AR-7 tester should indicate "PASS" (Green LED will illuminate)
- Release the pushbutton.
|
3b. Testing High Pass
Set the rotary switch on the front panel of the checker to the third position (Right Green Circle)- High Pass
| Testing AR-7 Wrist Strap Tester |
AR-8 Wrist Strap and Footwear Tester |
- Press and hold metal pushbutton on the center of the tester by the yellow banana plug.
- When the calibration is correct, AR-7 tester should indicate "PASS" (Green LED will illuminate).
- Release the pushbutton.
|
- Press and hold metal pushbutton on the left of the tester (wrist strap button) by the yellow banana plug.
- When the calibration is correct, AR-8 tester should indicate "PASS" (Green LED will illuminate).
- Release the pushbutton.
- Press and hold metal pushbutton on the right of the tester (footwear button) by the yellow banana plug.
- When the calibration is correct, AR-8 tester should indicate "PASS" (Green LED will illuminate).
- Release the pushbutton.
|
4. Testing High Fail
Set the rotary switch on the front panel of the checker to the fourth position (Red Circle)- High Fail
| Testing AR-7 Wrist Strap Tester |
AR-8 Wrist Strap and Footwear Tester |
- Press and hold metal pushbutton on the center of the tester by the yellow banana plug.
- When the calibration is correct, AR-7 tester should indicate "High Fail" (Red LED will illuminate).
- Release the pushbutton.
|
- Press and hold metal pushbutton on the left of the tester (wrist strap button) by the yellow banana plug.
- When the calibration is correct, AR-8 tester should indicate "High Fail" (Red LED will illuminate).
- Release the pushbutton.
- Press and hold metal pushbutton on the right of the tester (footwear button) by the yellow banana plug.
- When the calibration is correct, AR-8 tester should indicate "High Fail" (Red LED will illuminate).
- Release the pushbutton.
|
If at any time during the verification of calibration of the tester using AR-CAL.CHECK the tester does not indicate with the LED's or sound the proper color you must send the tester for factory re-calibration.) |